Calibrated Monitoring for Music Mixing and Mastering

Maintain Consistency for the Best Results
Consistency is a key element to success, especially when we’re mixing and mastering for clients and commercial releases. The most reliable method for maintaining consistency in terms of quality, level, punch, and clarity is by using a calibrated monitor system. Such a system takes into account our brain’s natural loudness curve, enabling us to create mixes that sound balanced and full regardless of the volume at which they're played.
It's important to differentiate between volume and loudness. Volume describes how loud the sound is on our speakers, while loudness relates more to the intensity or density of the energy within a mix. Think about it this way: a loud sound, like a car crash, will sound intense even at a low volume level, whereas the gentle rustle of leaves in a breeze maintains its peaceful energy regardless of the playback volume. Our brains perceive the amount of energy in a sound or mix, what we refer to as loudness.
When we're in the zone mixing and mastering, we’re balancing and processing tracks to shape the perception of how loud the music feels. Each song and genre has its sweet spot for intensity. An overly loud ballad might lose its emotional impact, but if it’s too quiet, it might lack the “glue” needed to hold the arrangement together.
Mixing in a calibrated space gives us a dependable method for gauging the loudness of our productions. Our mixes and masters consistently convey a balanced sense of strength and energy that reliably translates across different systems.

How Monitor Volume Affects Mixing and Mastering
Listening at extremely low or high volumes can cloud or distort our judgment because our perception of frequency balance changes with monitor levels. When the volume is cranked up, our attention is naturally drawn to the bass and treble. Conversely, at low monitor volumes, our sensitivity shifts towards midrange frequencies. This means that as the listening volume increases, the low and high frequencies become more prominent while the midrange recedes into the background.
The opposite is also true—at low listening levels the midrange will dominate and the bass and treble will feel weak. These shifts are perceptual. The music remains the same, but our brain perceives a different frequency balance.
In simple terms, when we listen at low volumes, music might seem thinner with a stronger presence in the midrange. On the other hand, at loud volumes, the bass and treble take center stage. This phenomenon has been extensively studied, notably by Fletcher and Munson, and is referred to as the equal Loudness contour of human hearing. Therefore, mixers and mastering engineers should work at a volume level that best represents the frequency response that will translate to the largest audience.
It turns out that the ideal listening volume depends partly on the size of the room we're in. In large spaces, the size of movie theaters or classrooms, 85 dB SPL provides the most even frequency response. For small rooms like home studios and modest-sized production spaces, 79 dB SPL is optimal. Consistently working at the proper volume helps us quickly gauge whether a mix properly fills the room versus when it lacks balance and glue.
While it is valuable to reference our mix at both loud and soft volumes to assess how the mix will translate at extreme levels, the majority of the work should be done at the calibrated volume.
How Calibration Helps
The purpose of a calibrated listening room is that we can quickly understand how a particular mix compares to other songs without needing to listen to those songs directly. We become so accustomed to how mixes and masters feel in our room when we always listen at a preset volume level. The "calibrated" aspect refers to that preset volume level.
You could calibrate your monitors by playing a great-sounding commercial release on your system and adjust your listening volume until the music fills the room but doesn't drown out conversation with someone nearby. If you locked your monitor volume at that level, you could then play your own mixes to compare how they stack up.
This works if you calibrate your monitors to some music with a very similar style and arrangement to what you’re about to work on. Proper calibration works everytime, regardless of the style of music in front of you.
To be sure, it's always a good practice to gauge your productions against reference mixes and masters. However, it's crucial to ensure that you're listening to high-quality reference tracks at a consistent volume level. For example, you wouldn't want to compare music playing from your DAW to a song streaming from YouTube via a web browser, as you can't guarantee the quality or the reference playback volume of a YouTube song.
Be sure to obtain your references from reputable sources like the iTunes Store, Qobuz, ProStudioMasters, or other sources where you can download official releases of lossless audio files.
Calibrate Your Listening Room
We want to be sure that whenever we listen to our DAW, we can accurately judge the power of a mix solely by listening to our monitors, without even looking at a meter. This requires that we set our monitor volume to a standardized reference level.
To set this up in your studio, you'll need an SPL meter and a DAW equipped with a signal generator plugin that can output pink noise. Pro Tools offers Signal Generator, Logic offers TestOsc, and Cubase offers TestGenerator. If you need a pink noise generator for your DAW, you can download and install Credland Audio’s free Pink plugin.
For the SPL meter, you can utilize either a hardware SPL meter or your smartphone with an SPL meter app. Just make sure that the meter offers a “C” weighting scale and a slow response time. For iOS, consider using the free NIOSH Sound Level app or the SPLnFFT Noise Meter ($3.99).
The Google Play store also offers several free SPL meters for Android devices. When measuring pink noise, you’ll notice that the meter jumps around a bit, even with the slow response setting. Just do your best to average the reading as the meter fluctuates above and below the average.

Left: NIOSH Sound Level Meter iPhone app. Right: Handheld SPL Meter.
Set Up Your DAW
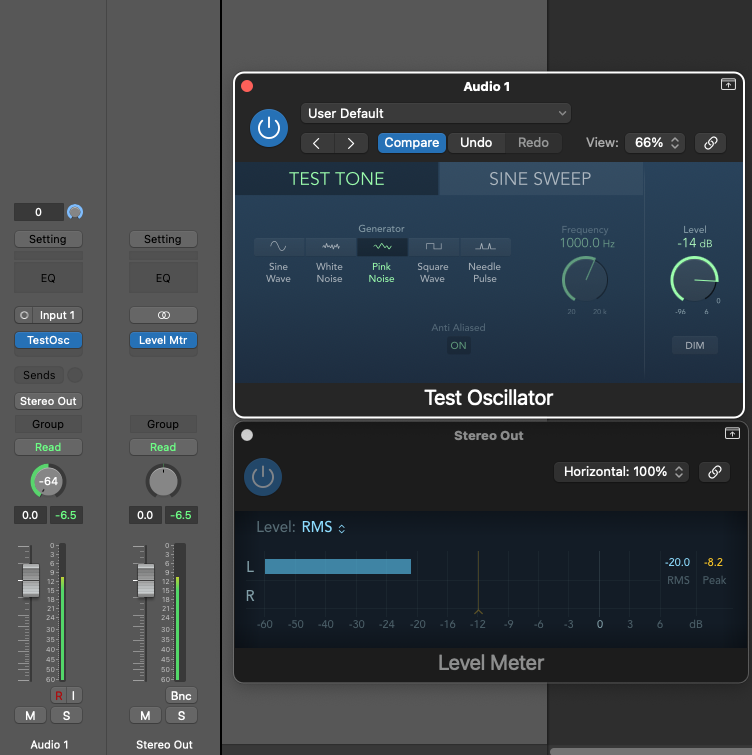
If you're using Logic, start by creating a mono track and inserting the Test Oscillator plugin, then set it to Pink Noise. Adjust the plugin’s Level control to -14 dB. Next, ignore the meter next to the fader and insert Logic’s Level Meter plugin on the Stereo Out channel and configure it to read RMS level. When the pink noise channel is hard-panned to one side, the Level Meter should display -20 dB RMS. If the signal is panned center, it will show -23.5 dB for both left and right channels. See the image below.

Logic Pro’s Test Oscillator set to Pink Noise. The channel fader is panned to the left and the Level Meter on the Stereo Out fader shows -20 RMS in the left channel.
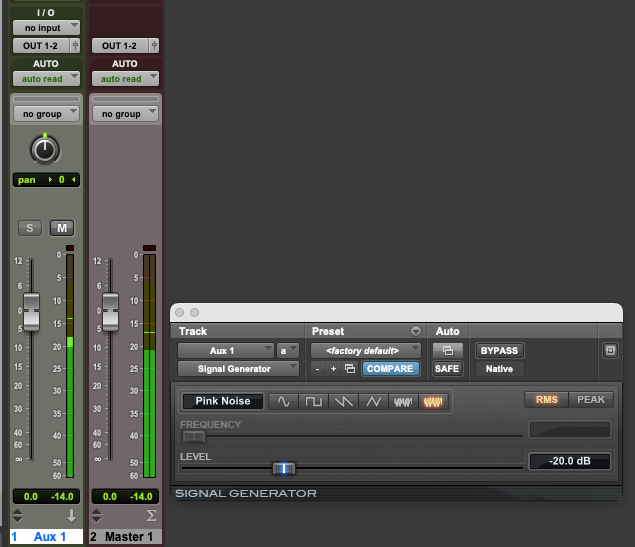
If you're working with Pro Tools, begin by creating a mono aux track. Then, insert the Signal Generator plugin on that track and set it for Pink Noise and RMS. After that, create a master fader. The meter on the master fader (set to Digital VU) should indicate -20 RMS, with the peak level slightly higher. See the image below.

Pro Tool’s Signal Generator plugin is set to Pink Noise (RMS). The master fader shows -20 RMS and a slightly higher peak level.
Begin Calibration
Note: This calibration works for small control rooms, about the size of a typical bedroom. For larger rooms, you can increase the SPL measurements by a few dB. For instance, movie theatres calibrate to 85 dB SPL, while bedroom studios should calibrate to pink noise at 76 - 82 dB SPL.
- Activate your SPL meter and ensure it's set to C weighting/Slow response. Place the meter at ear height, centered in your listening position, with its microphone pointing upwards.
- Gradually increase your monitor volume until the SPL meter registers 76 dB SPL. Avoid adjusting your monitor volume control once set.
- Pan the audio track to the right channel and observe the SPL meter. If the right speaker exhibits a level more than 0.5 dB different than the left speaker, you'll need to adjust the level control on the rear of your right speaker or the trim control of your power amp (if using passive speakers).
- After adjustment, each speaker, when played individually, should display 76 dB SPL on your meter.
- With the pink noise panned to the center and both speakers playing pink noise, your meter should register approximately 79 dB.
- Mute the pink noise and import a mastered song onto a stereo track in your DAW, but DO NOT PRESS PLAY YET!
- Since the track has been mastered, reduce its volume by 10 dB.
- Play the track. The master should fill the room, but not feel too loud. Its volume should read about 85 dB SPL.
- If you find the level uncomfortably loud or too soft, fine-tune the volume at the monitor controller, but avoid changing it by more than 2 or 3 dB.
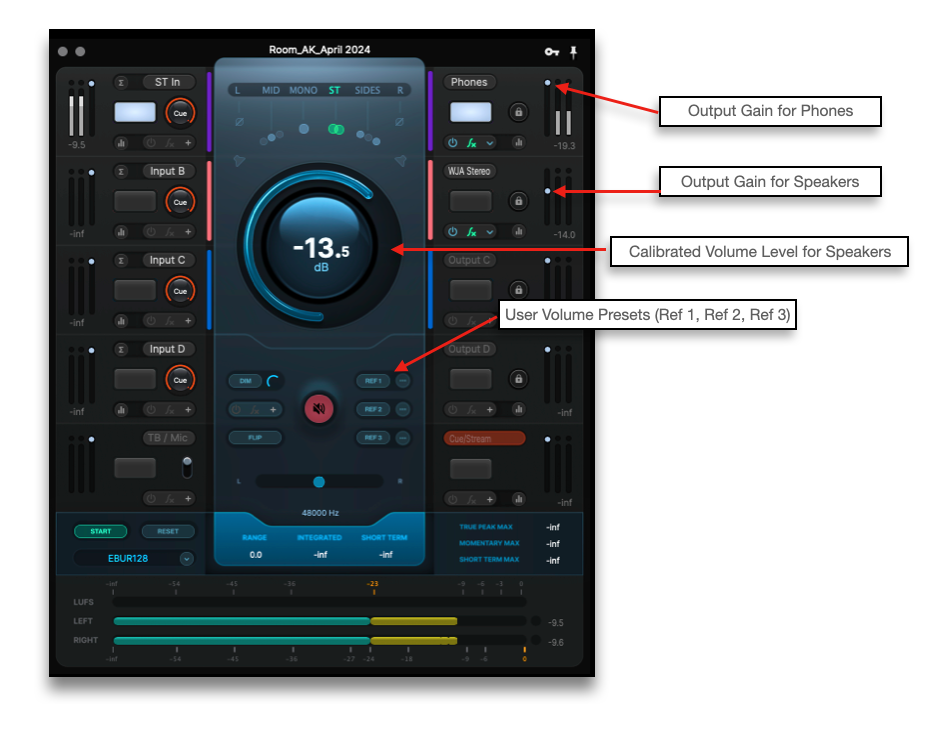
- Once you're satisfied that this level works well for several of your favorite masters, mark the position of the monitor volume control with a sticker. Alternatively, if you're using Sphere as your monitor controller, you can simply store this setting as your REF 1 level.

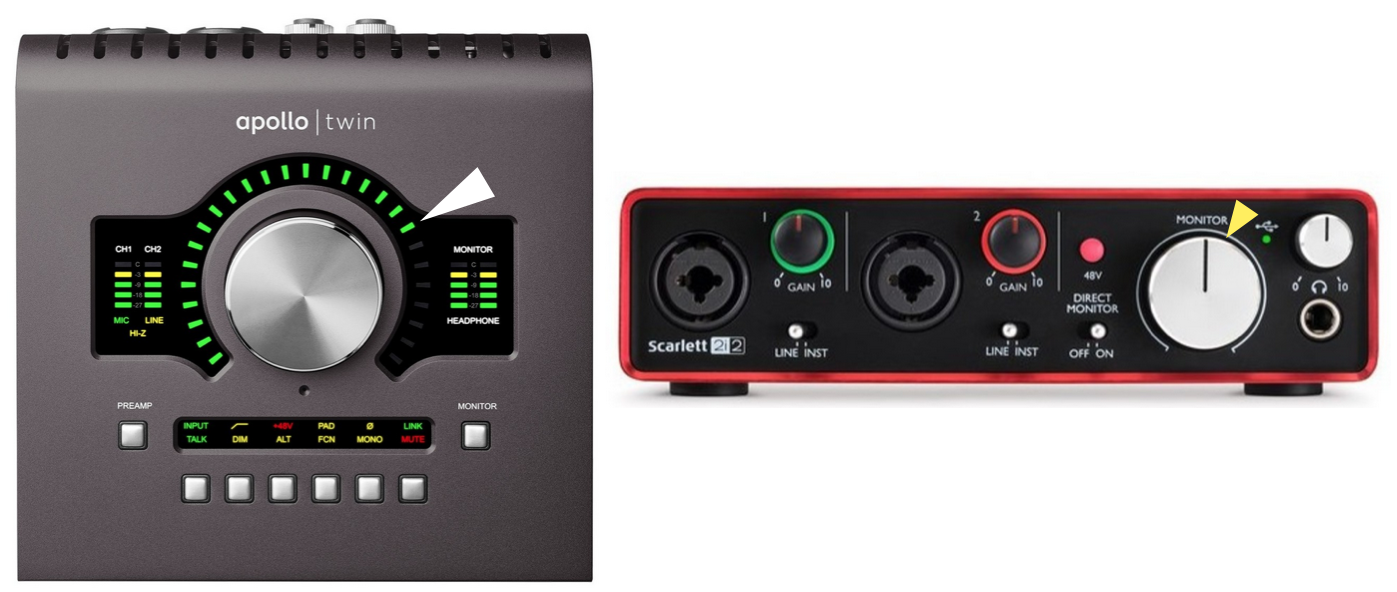
If your monitor controller doesn’t have a numerical readout of its volume, cut a sticker in the shape of an arrow to mark the calibrated volume level.
Calibrate Your Headphones
If you frequently work on headphones, here's how to calibrate their volume. Begin by listening to music through your speakers, then quickly switch between the speakers and your headphones. Adjust the headphone volume until it matches the loudness of the speakers in the room. Once calibrated, mark the position of your headphone volume control.
If you're using Sphere, you can adjust the output gain offset slider for each output to level-match the headphone and speaker volumes. This ensures that your master volume control affects both the calibrated speaker and headphone volumes simultaneously.

GroundControl ROOM monitor controller provides a main volume control and individual gain control for each speaker or headphone output so a calibrated level will control every set of monitors.
Enjoy Your Success!
From now on, you'll mix and master while leveraging the equal loudness curve to maintain consistency across every song you release. It is useful to briefly check your mix at both low and high listening levels, but the bulk of your work should be done at the calibrated monitor level.
At low listening levels check to make sure the lead vocal, main groove, and melody instruments remain audible. Conversely, at louder levels, nothing should be painful and the low end shouldn’t break up way before the vocal feels loud enough.
Calibrating your room for loudness is an essential step towards consistent mixing and mastering. Calibrating your monitors for an ideal frequency response is equally important and tools like Sonarworks SoundID create the optimum EQ curve for your monitors in your listening environment. Tuning up your monitor system like this puts you well on your way to creating professional-sounding, competitive mixes and masters.


