How to Add a Subwoofer


In our article, Do I Need A Subwoofer?, we discussed how a subwoofer can improve a monitor system and the difference between bass-managed systems and subwoofers used for LFE reproduction. In this article, we’ll explore how to properly integrate one or more subwoofers into a system. Here are some things to remember from our last article:
1. You should base the selection of your main speaker system on the size and geometry of your listening area.
2. Adding a subwoofer will increase the bass extension of your main system and the efficiency of your main speakers.
3. Adding a subwoofer to an underpowered system won’t increase the volume in your room, but will only increase the usable frequency response of your monitor system.
A subwoofer, like your main speakers, should have enough headroom to allow 20 dB of max level above your typical listening level. For example, if you typically listen at 80 dB SPL, your speakers and sub should have a max SPL output of at least 100 dB, preferably higher. Speakers that can’t handle the necessary headroom will either distort or possibly even blow a driver, so extra headroom is always a good idea. For professional setups, even in small rooms, I would suggest speakers with a maximum output of at least 110 dB SPL and subwoofers with at least 115 dB SPL max output.
One Subwoofer or Two or More?
For small rooms, under 1800 ft³ (50 m³), a single sub for bass management will suffice, as long as it is sized and powered to match your main system. Atmos and other immersive or surround formats can employ one sub for both bass management and LFE duties, or you may choose to use one subwoofer for bass management and another one for LFE. For larger rooms with powerful main systems, two subs for bass management and one or two additional subs for the LFE channel would be appropriate. For this article, we will focus on the most common situation of one or two subs, as the complexity increases as more subs are added.
Remember that for bass management, a single sub with a crossover point at 80 Hz or lower will work well, even for stereo music. The LFE channel (the .1 channel in 5.1 or 7.4.1), reproduces low-frequency effects that do not cross over with the main system and requires a frequency response from around 20 Hz to 120 Hz. If one subwoofer will be producing both bass-managed low frequencies and LFE low frequencies, the setup becomes a bit complicated because two different signals will need to be routed into the subwoofer.
Fortunately, Sphere provides routing for separate bass management sub(s) and LFE sub(s), or it can merge both signals into one subwoofer. We will explore how to set that up later in this article.
Where to Place the Subwoofer
Before we get into the sub’s positioning, you should be familiar with how to use a sweep tone. This sweep will be helpful in a few different ways for setting up your sub and you may also find it helpful for other acoustic measurement tasks, like locating the best listening position in a room. Point your browser to www.onlinetonegenetor.com. Then click on the Sweep Generator tab and Make sure your browser will play audio to your monitors. We will come back to use this sweep shortly.
Typically, a single sub will not perform optimally if placed in a corner or exactly between the left and right walls, but any other location in the front area of the room is fair game. We want to find a location with the most even bass response when heard from the listening position. Finding this location is actually pretty easy, and a good starting point is somewhere close to the front wall, between 25% and 40% of the distance between the side walls. We will employ a simple method called the crawl test to find the best location for the sub. This method works for positioning a sub whether it will be used for bass management, LFE, or both.
First, place the subwoofer on the floor at the listening position and connect it to your monitor controller or interface. Next, you’ll play a sweep of low frequencies through the subwoofer at a comfortable volume while crawling around in the front of the room where you think the subwoofer will ultimately be located. For the sweep, go to www.onlinetonegenerator.com and select the “Sweep Generator.” Enter the following settings: Start Freq: 30 Hz, End Freq: 125 Hz, Duration: 20 seconds. Select sine wave and linear sweep, and a volume of 40 should be a good starting point. Test to make sure the sweep plays at a comfortable level through only your subwoofer.
Now, listen to the sweep at a few locations about 1-foot (30 cm) apart along the front of your room. Try to stay in line with where your main speakers will be and close to the front wall. The sweep will probably vary in loudness like a rollercoaster across its frequency range, which is to be expected. As you test various locations, there will be one location where the sweep will sound more even across the frequency range. There will still be variations, but we are looking for the location with the most even response. Mark this spot with a piece of tape, as this is the spot where you should place your subwoofer.
If you have two subwoofers they should be placed symmetrically in the room. Once you’ve found the location for your first sub, you can mirror its location from left to right with the second sub. Now sit in the listening position while playing the sweep tone through the sub(s) and listen for an evenness in volume across the frequency range. It will probably not be perfectly even, but hopefully, you’ve found the location with the most even reproduction.

Subwoofers typically perform best at around 25% to 40% of the distance between the side walls. Still, the ideal location can be found by placing the subwoofer at the listening position and crawling around the front of the room to find the location where the bass response is the most even. Two subwoofers should be situated symmetrically, as shown.
Route Audio to the Subwoofer and Main Speakers
Now we need to integrate the bass-managed sub with the main speakers. This can be done by ear, without any measurement tools, but may go quicker with an SPL meter or real-time analyzer. To integrate a sub with your main speakers, you will need to be able to adjust the volume, phase, and crossover point of the sub to integrate it with the main speakers. Some subwoofers provide volume, polarity, and crossover controls on their back panel, while some subs and more complicated setups will require some kind of electronic crossover to integrate the sub(s). Sphere provides all the controls we need, so let’s see how we set up a sub using Sphere’s built-in bass management controls.
Our goal is to route the low frequencies to the subwoofer and the high frequencies to the main speakers. Together, they should reproduce the full frequency spectrum without any noticeable dips and boosts where the sub and the main speakers cross into each others’ frequency range.
In the image below, the left graph displays the frequency responses of the Yamaha HS7 speaker (purple) and the HS8S subwoofer (green). If the speakers were played together without a crossover, it is clear that the frequency range between 50 Hz and 100 Hz would be exaggerated since it is produced by both the speaker and subwoofer. The image on the right shows how a crossover directs the low frequencies to the subwoofer and the higher frequencies to the main speakers. The frequencies overlap (“cross over”) in a way that ultimately creates a flat frequency response from ultra-low, through the crossover region, up to the ultra-high frequencies.

Left: Frequency response of Yamaha HS7 (purple) and HS8S (green). Right, the frequency response of a properly crossed-over sub (green) and main speaker (purple)
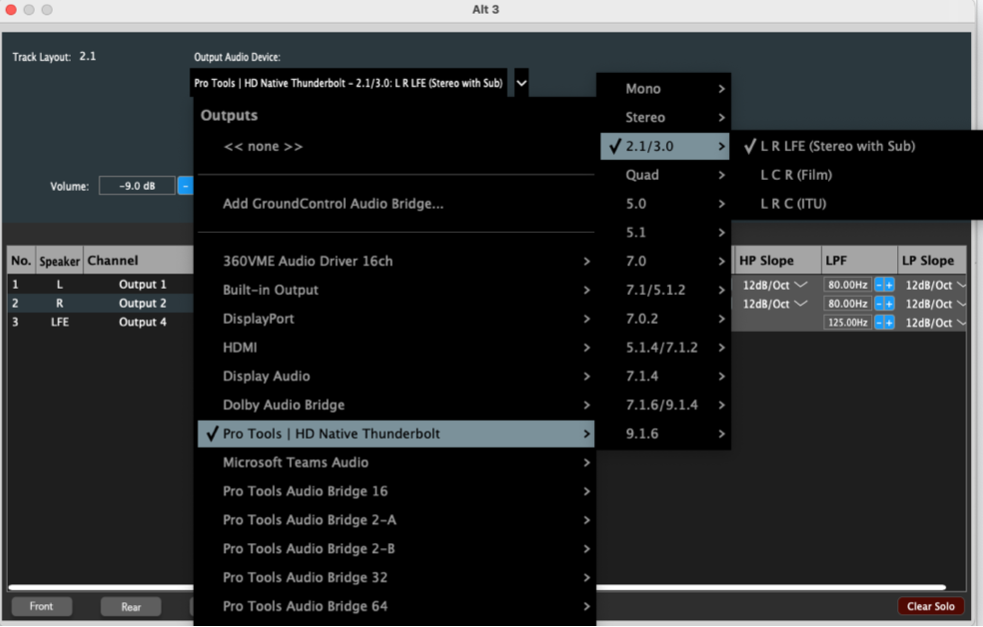
Routing the correct frequencies to the sub requires a low-pass filter, and the main speaker requires a high-pass filter. Here is how that setup is built in the Sphere output setup window. Make sure the Output Audio Device is set to “2.1 > L R LFE (Stereo with Sub),” which requires an audio interface with at least three outputs (see image below).

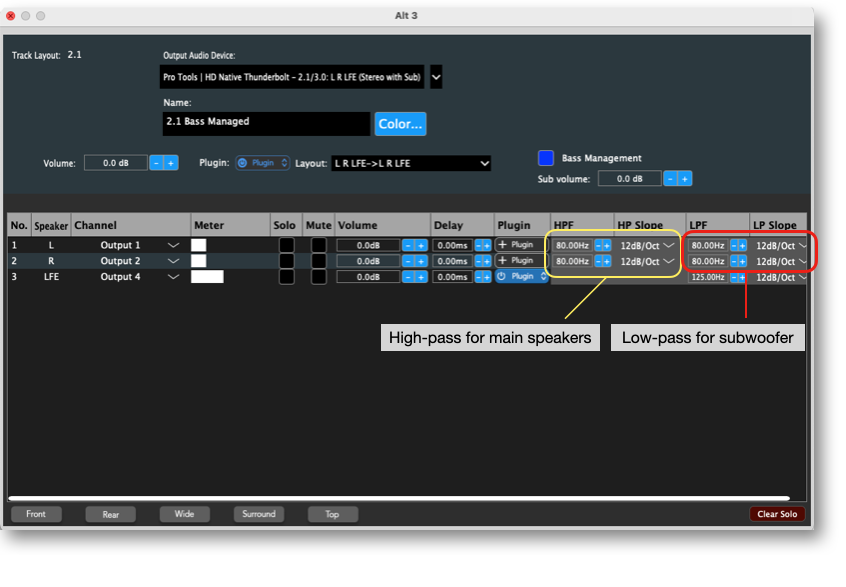
Next, check the box for “Bass Management” and route two interface channels to the main speakers and one output to feed the subwoofer. In the image below, outputs 1 and 2 feed the left and right main speakers while output four feeds the sub. Next, set the high-pass filter (HPF) to 80 Hz and the slope to 12dB/Octave or 24dB/Octave.
I usually prefer the “Linkwitz-Reily” setting for crossover filters, but you can also audition the “Butterworth” option to hear which sounds better. Set the low-pass filter (LPF) to 80 Hz with the same slope and filter type you chose for the HPF. In this example, a plugin has been inserted on the subwoofer channel to allow its polarity to be flipped to match the main speakers (See image below).

The volume balance between the main speakers and the subwoofer can be adjusted using the volume control on each channel. Sphere’s main monitor volume control will turn the whole system up and down while maintaining this balance.
Dial in the Lows
Now that we have audio routed correctly to the main speakers and subwoofer, we need to balance the subwoofer volume vs. the main speakers. Go back to www.onlinetonegenerator.com and click on the “Subwoofer Testing” tab. Press the play button next to the 80 Hz test tone (or whatever crossover frequency you’ve chosen for your sub).
Instead of the online tone generator, you can also use a signal generator in your DAW to play an 80 HZ sine wave. The 80 Hz tone should show up in Sphere’s output meters and be audible in the subwoofer and the main speakers.
First, check the subwoofer polarity. Your subwoofer may have a polarity switch on its rear panel, but if not, you can insert a plugin with a polarity switch (often labeled ø)on the subwoofer channel in Sphere. While sitting in the listening position, play the 80 Hz tone and flip the polarity switch back and forth to determine which setting provides the loudest output. That is the setting where the subwoofer and main speakers interact best.
Next, we want to set the volume of the subwoofer to match the volume of the main speakers. For this, select the “Sweep Generator” in the Online Tone Generator. Enter the following settings: Start Freq: 30 Hz, End Freq: 125 Hz, Duration: 20 seconds. Select sine wave and linear sweep. Sit in your listening position and play the sweep and see if the sweep maintains a constant volume across its entire frequency range.
There will be dips and peaks during the sweep, but the average volume of the sweep should remain constant. If the sub is too loud, lower its volume in Sphere’s output window. If the sub is too quiet, turn down the main speakers. Now listen to several songs that you are familiar with to feel how the sub integrates with the main speakers. If the bass feels overpowering, you can lower the subwoofer, while if it feels too light, increase its volume.
At this point, you shouldn’t hear two speakers and a sub, you should hear a full-range playback system with an extended frequency response and wide dynamic range. Listen to and enjoy some of your favorite music!


